Tuesday, 12 April 2011

Spicy Garlic Eggplant with Chicken, Shrimp, and Scallop


2 Chinese Eggplants (long thin purple, good stuff) – Cut into ½ - ¾ inch chunks
1 Chicken Breast
1 Cup of baby shrimp and scallops
3-5 garlic cloves, thinly sliced (or be lazy and use a press, but thinly sliced looks nice, just sayin’)
1 Large white onion
1 tbsp soy sauce
2-3 tsp Sriracha (hot stuff)
1 lime
Fresh Bundle of Thai ‘Holy’ Basil (has a nice spicy licorice flavour), if you can’t find Thai basil use 2-3 star anise and fry them in the oil from the very start.
 1tsp sugar (could be brown, white or palm sugar)
1 tsp veg oil
Rice:
1½ Cups Sushi Rice
½ Cup Jasmin Rice
2.5 cups water
Rice: Rinse  rice 3 times, on 4th time add extra water and vigorously rub rice grains together to polish them.
Strain with fine mesh sieve and let sit for 30 mins
Add 2.5 cups water and cook on medium with lid off for 15-20 mins until completely absorbed, then take off heat and put lid on for 5, fluff, and let sit 5 more mins with lid on. 
Main:
Start by cutting the onion thinly and cooking it on medium for 15-20 mins, until translucent and slightly caramelized.
Now, heat the oil and fry the eggplant until golden brown on the outside.  Set aside.
For the protein, start by cutting the chicken into thin slices (roughly 1/3 inch). Fry the chicken briefly on high heat until golden on the outside. Then push the chicken aside and cook the shrimp and scallops for a few minutes until almost fully opaque.
Add the Garlic and continue frying for a minute, then add the mostly cooked onion and eggplant.
Mix the soy, sriracha, juice of 1 lime, and sugar. Pour into the pan and mix it around until completely incorporated. Rip up the basil leaves and throw them in at this point, let cook for 1 minute or 2.
This dish is easy to make and the Thai basil and lime give a really fresh flavour pop which is complemented with the kick from garlic and Sriracha. This dish could be done without the chicken, or with more seafood instead of chicken, or vegetarian if you add extra eggplant and use no meat/seafood.
Serve over hot rice.

Stay hungry my friends.


Duck & Barley Soup


2 Large white onions
9 medium Carrots, or 4-5 large (washed and trimmed)
5 or 6 Celery Stalks (washed and trimmed)
1 Head Garlic
1 Duck Body w. neck, heart, and liver (I used the legs and breasts in other recipes)
½ cup Pearl Barley
A few gallons of Water
Stock:
Start the soup by making a stock by boiling the duck with 1 large onion and a few garlic cloves. After 3 hours take all the duck, onion, and garlic out (throw the onion and garlic out).  Pick all the meat off the duck body, and other duck parts if you’re feeling adventurous. During the 3 hour cooking period add water every 45-60 mins to keep the duck covered.
                                                  Just plucked all the supple duck meat
Let the stock sit in the  the fridge over night so that the fat hardens. When you take the soup out remove the layer of fat on top.
Soup:
Bring the stock to a boil and add the duck meat you picked off the body. Bring back to a boil and add barley, let  simmer for 30 minutes. 
 Give the veg a medium chop and add bring the soup to a boil then simmer for 20 minutes. 
 
In the last 5 mins of cooking press the garlic into the soup with a garlic press, or if you don’t have a garlic press you can roughly chop the garlic put it in earlier with the other veg.
 Enjoy the soup with some soy sauce! (maybe some hot sauce if you want some heat)

Stay hungry my friends


Monday, 28 March 2011

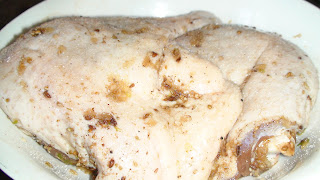
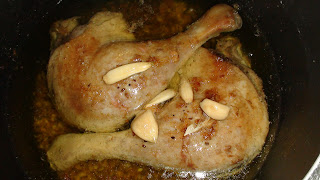
Garlic Duck Confit with Tri-Licorice Soy


What you need:

2 duck legs, skin pricked with sharp knife or needle repeatedly to help the fat render out during cooking and make it crispy!
1 tub of duck fat (300 g)
1 clove of garlic
1-2 tsp Sea Salt
1 tsp caraway
1tsp anis seeds
1 tsp fennel
1 tsp of soy sauce
1 pot,  no lid
oven preheated to 225 F

So I thought I would try adding a little soy sauce to the traditional duck confit, I added about 2 tsp or so and let it sit for a few hours in the fridge, then I wiped it off and went about business as usual.


Toast the spices in a pan until you smell the licorice aroma, then coarsely crush Anis, Fennel, Caraway. I chose these three spices because they are all like slightly differently licorice flavours, and the combination with the garlic and duck is just wonderful.


So, after patting the duck legs dry rub with crushed spices and pressed garlic, 3-4 cloves should do it. Then apply some salt to the skin, this will help dry it out over the next day or so, while it rests in the fridge, don’t worry about putting too much because you wipe the majority of it off right before cooking it!

Leave to absorb flavours overnight in the fridge, take out of fridge a half hour before cooking to let come up to room temperature. Wipe of the salty garlic spice paste off the duck legs and put them in a small pot with the tub of duck fat, the duck should be covered by fat, however, mine was almost covered with fat and came out just fine. Peel a few garlic cloves (maybe 3-4 big ones, or even a whole clove if you’re a garlic head!), these wil slowly cook with the duck and give off wonderful flavour and aroma.


Put the pot with the duck fat and legs into a preheated over at 225 F, for 3-4 hours ! When a knife slides right through the meat, you know you’re good to go. Take pot out of the oven and let sit to cool for a half hour, then throw the whole thing in the fridge, and let the duck fat firm up. You can keep these duck legs in the fat like this for over a week without going off. When you want to use one, take it out of the fat, scrape off the majority of the fat, and pan fry it until crispy on the outside and warmed through.


Also, you don’t have to stop there, you can incorporate the duck meat into lots of different pastas, or I was thinking that it would be really tasty in a homemade poutine with some onion and duck fat gravy, possibilities are endless!

White Wine Mussels with Chives and Paprika

What you need:
  • 1 bag of mussels (I got some PEI rope grown blue mussels from my local, 3.99, smell them first! you are hoping that they don't smell fishy, if they do, don't buy them!
  • 2 bowls
  • some white wine, I used a tasty Jacobs Creek Semillon Chardonnay that was a gift for my birthday, thanks again sammy n ryan!
  • 2-3 cloves of garlic
  • 1 tsp of really good paprika, I used some from morocco, smells so much different than the cheap stuff you get at the grocery store
  • nub of butter
  • tbsp of finely chopped chive


PREPING THE MUSSELS:
  1. Get two bowls ready, in one put empty the bag of mussels and rinse thoroughly in cold water.
  2. Go through each mussel individually and put the ones that are closed into the other bowl, throw out any mussels with cracked shells.
  3. The mussels that didn’t open, tap them on the counter, or with your finger a few times, give them a minute, if they are still alive they will close completely, and you can put them with the other good mussels. If they still don’t open after being tapped a few times and waiting, throw them out.
  4. NOW, take a regular knife and use the back of it to scrape the tiny barnacles off the mussels under some cold water. This will take 5-10 minutes, so put on some music and get into a rhythm. Give the mussels one last good rinse and drain them completely. Store in fridge if not using right away, but if waiting a day to use them, you’re better off double checking the mussels with the tap test with any mussels that are open (BETTER SAFE THAN SORRY).
Directions:
Heat butter in pan until it foams on med-high, then add the garlic, chives, and paprika. Cook for less than a minute, then add a good splash of wine (not too much because the mussels have water trapped in them, called liquor.

Stir to combine, and after 30 seconds add the mussels. Cook for 5 or so minutes with the lid on until all the
mussels have blossomed open, watch them open over a glass of Jacob’s Creek Semillon Chardonnay.

Any
mussels that did not open, or are not fully open, throw out!

Move the mussels into a large bowl, and
pour broth over the mussels, serve with cold wine


Stay Hungry My Friends


Thursday, 24 March 2011

Spicy Thai Pork Ribs with Garlic Ginger Sauce


What you need:

A pressure cooker, amazingly useful for cooking food quickly! Get one
2 small racks of ribs (I used pork)
2 tsp ginger paste
2 tsp coriander paste
1 tbsp sriracha
2 tsp  fish sauce
1 tsp chicken stock powder, or 1 cube bouillon, or use a cup of chicken stock and put less water in
5 garlic cloves, pressed
3 tbsp brown sugar
1 tsp anise seeds, coarsely ground
A few cups of water, just enough to cover the ribs
1 lime

The combination of the heat from the chilli, the sour from the lime, the salty form the fish sauce, and the sweet from the sugar is magical. This classic Thai flavour profile works really well with the intense meaty flavour the meat gives off while being pressure cooked and pan fried. Enjoy these ribs on some thai stick noodles, or if you’re lazy – peel the meat off and make a rib sandwich, either way you should serve this with lime wedges to cut the hot/sweet/salty flavours of the sauce!

Alcohol Pairing: Works well with any beer, I had a Belgium style beer with coriander which worked well with the coriander in the dish.

I was at the restaurant The Tuck Shop recently, and they had Thai Ribs on the menu, I was going to get them but instead got fish ribs instead (which were great). Anyways, I wanted to make the ribs that I imagined I would have been served at The Tuck Shop had I ordered them, so I threw this together and was happy with the result!

Get out the pressure cooker, heat some oil, pat the ribs dry, sprinkle the anis seeds on the ribs, brown the ribs (don’t cook them through!, we’re just looking for some colour, which will translate to FLAVOUR!)
After browning the ribs, take them out and put them aside, and add to the pressure cooker the rest of the ingredients and about a cup of water (then add more water once you put all the ribs back in), stir.


Add the ribs back into the pressure cooker and arrange them to take up the least room as possible, now add a bit more water until the ribs are just covered.

Add caption
Cook on medium heat for 45 mins, let sit for 15-20 mins after to cool off and let the pressure to dissipate.
Take ribs out, pan fry them until crispy. While they are frying, reduce the cooking broth and incorporate that into the ribs when they are looking ready.

Serve over Thai stick noodles, or make a rib sandwich like I did, with a cold beer, bi-winning.

Stay hungry my friends

Tuesday, 22 March 2011

First time Butchering a Duck

So it was my birthday on sunday, and my gf got me a duck! I'm always keen on doing new things in the kitchen so I decided to butcher it up, with no instruction, just winged it..no pun intended. I think it turned out pretty good, and I can't wait to use the breasts, legs, and body in three different recipes. Three posts, three times the duck coming at your face.

*taking suggestions on what to make with the legs and breasts, body is getting used in a hearty soup!

stay tuned for more.......

3 NEW RECIPES COMING!

BAM!


 Looks so peaceful...nom nom nom


Looking alright for a first time job!


This will make a fine soup! recipe to be posted soon, duck and barley soup!


Taking recipe suggestions for the breasts and legs, they are in my freezer presently, waiting to be used! 
Drop me a message if anyone is out there..


I feel A little like dexter..tonight is the night..


Sunday, 20 March 2011

Lazy Sunday Breakfast Sandwich

CHECKOUT THE YOUTUBE VIDEO!

http://www.youtube.com/watch?v=ncuPX6vjW_o


·      2 Slices of bread, I used Rye
·      1 egg
·      Some cold cuts, I used 2 slices of smoked meat & 2 slices black forest ham
·      Some cheese (I used aged cheddar)
·      Piece of lettuce
·      Mayo
·      Butter
·      Cracked black pepper

Directions:

1.   Fry egg in some butter for 1 minute
2.   Add a little water to create steam
3.   Quickly cover with lid
4.   Toast bread
5.   Let egg cook another minute or so
6.   When egg yolk turns a little opaque you know it has set a little, and is good to go
7.   Spread toast with butter and mayo
8.   Add cold cuts and egg on one piece of toast (freshly crack pepper on egg)
9.   Put cheese and lettuce on other piece
10.      Put slices together, cut and serve


 The egg is oooozing everywhere, so warm and delicious

 Next time I'm frying the cold cuts for a minute to warm them up a little, mmm.
ENJOY CATCHING UP ON SOME TV WITH A SAMMICH AND SOME COFFEE!


CHECKOUT THE YOUTUBE VIDEO!

http://www.youtube.com/watch?v=ncuPX6vjW_o

Bacon Choco Chip Cookies with hint of Irish Coffee


This is an old family recipe, some great childhood memories live here. I decided to twist it a little today by adding some crispy bacon and velvety Sheridan’s Irish creamy coffee liqueur. Breakfast in a bite!
**don’t be lazy, sift the flour at least 2 times!


  •  ·     cups triple-sifted flour (measure after sifting)
  • ·      1 tsp. salt
  • ·      1 tsp. baking soda
  • ·      1 cup softened butter
  • ·      1 cup firmly packed dark brown sugar
  • ·      1 Vanilla bean, sliced lengthwise, scrape out the caviar! (or use 1 tsp vanilla, us the good stuff!)
  • ·      1 tbs Sheridan’s Irish Coffee Liqueur (this stuff is amazing)
  • ·      1 egg
  • ·     1/2 cup roughly chunked bacon, pre-cooked in oven (line baking tray with foil, and bake bacon at 400 for roughly 20 minutes, sometimes a few minutes less, keep an eye on them! After the bacon cools it will become very crunchy and brittle, yum!)
  • ·      2 cups chocolate chips (1  pack) or roughly chopped baking chocolate (I love milk chocolate so that’s what I’m using, but if your into dark or semi sweet or white or whatever you like --- USE IT!

  1.  Preheat the oven to 375 F
  2.  Sift together dry ingredients in a bowl, set it aside
  3.  Combine butter, sugar, vanilla and water
  4. Add the egg and beat until creamy
  5.  Add dry ingredients, mix this well!
  6.  Stir in the bacon chunks and the chocolate chips/roughly chopped baking chocolate
  7.  Line a cookie sheet with aluminum foil, face the shiny side up! (or parchment paper, OR Silpat silicone non-stick mat, whatever you have!)
  8. Drop the cookie dough onto ungreased foil by the tablespoonful, about one inch apart
  9. BAKE about 10 -12 minutes, or until they turn light brown

**Take the cookies out of the oven. If you find them soft, let them cool a bit on the baking sheet to solidify a little! Enjoy with a tall glass of milk!

Stay hungry my friends


PICTURES COMING SOON!!

Tuesday, 15 March 2011

Filet Mignon with Fresh Coriander Garlic Glaze And Crunchy Sweet Potato Chunks

MARCH 14th SPECIAL:  STEAK AND .... POTATO DAY

Fillet Mignon Marinade/Glaze:
  • 1 heaped tsp ginger paste
  • 2 heaped tsp coriander paste
  • 1 tbsp white sugar (infused with vanilla bean, you would be surprised how nicely a subtle hint of vanilla works with savoury dishes)
  • 1 good squirt sriracha hot sauce, more or less depending on how spicy you like it!
  • 2 tbsp tempura soy sauce (could use regular, but as i’ve mentioned, I prefer the sweeter more mellow taste of kikkoman’s tempura sauce)
  • 2 big Quebec garlic cloves, pressed
  • Splash of the white wine I’m drinking with dinner (I’m not into red wine! I’m sure you expected red, but not today, today i’m enjoying some Brumont, a  sauvignon and gros manseng blend, recommended by Jeremy Banks (astute wine technician) years ago, I fine addition to my white wine short list!)
Other:
  • 1 Large sweet potato
  • 1 pinch of Chinese 5 spice powder ( ground cinnamon, anise seed, cloves, ginger, and fennel)
  • Glug of oil (enough to coat potatoes)
Directions:
Turn oven on, 350 or so should do.
I Didn’t have long to marinate the steak, only about an hour and change, so to make the marinade effective I rubbed the fillet with some vinegar first to open the pores up (use whatever you have on hand, I used some rice vinegar because its all i had), you don’t need to bath the meat, just put a little bit and work it into the meat, show your meat some love, massage it.


Start on the Potatoes by soaking them in some water to pull some starch out and make then crunchier on the outside when they cook. Dry Thoroughly, cut into medium chunks, toss with some oil and five spice blend in a large bowl. I deep fried the potato first for a few minutes to help crunchify the exterior, and then threw them in a warm oven @ 350.
Once you’ve massaged a little vinegar into the meat, now you can put the marinade together and put your meat in. Move the meat around every fifteen minutes so it gets properly drowned. 
Turn up that grill and pat the steak dry quickly with some paper towel, reserve the marinade to baste the meat while its searing on the grill. 


Once the outside is looking picture perfect to you it’s time to throw it in the oven to finish off the middle of the steak, which is completely raw.


Put the steak in the oven to finish on the tray with the potatoes, and let cook for 5-10 minutes before turning up the heat from 350 to BROIL. Keep a close eye on the potatoes so they don't over brown (chef term for BURNT), keep moving them around on the tray, try one and when they 
are crunchy on the outside but soft on the inside, take them out and place on some paper towel to absorb any excess oil, toss with some salt and pepper lightly. Just as you basted the meat on the grill, do the same while its broiling in the oven. **If you have enough marinade left over  bring it to a boil & reduce it in a pan until it coats the back of a spoon, drizzle over meat after plated if you're a star**

If you have a thermometer use it! Medium Rare is internal temp. 145 F and medium is 160 F. Otherwise, feel the steak, medium rare (my preference) feels like the thumb muscle when touching your thumb to your index finger, medium will feel like thumb to middle finger, then take steak out and let it rest for 5-8 minutes (depending on thickness). DO NOT CUT INTO IT RIGHT AWAY!! EVER...All the juices will run out and leave you high and DRY. The resting time allows the delicious meat juices to redistribute all over the steak, and any excess juices that run onto your cutting board are ‘WHY YOU DO THIS’, pour these juices over the meat after cutting it, and serve your glistening meat with PRIDE!!
click pictures to enlarge